 ultimate-guide
Why Retaining Wall Drainage in Clay Soil Is Critical
Table of Contents
- Why Clay Soil Makes Retaining Wall Drainage Non-Negotiable
- How Hydrostatic Pressure on Retaining Walls Builds Up in Clay
- Signs of Retaining Wall Failure to Watch For
- The Best Backfill Material for Clay Soil (And What to Avoid)
- How to Install Weep Holes in Retaining Walls: Step by Step
- DIY vs. Professional Installation: When to Call a Hardscape Crew
- Maintenance Schedule and Soil Testing for Long-Term Retaining Wall Drainage
- Frequently Asked Questions
Last Updated: September 28, 2026
Why Clay Soil Makes Retaining Wall Drainage Non-Negotiable
Clay soil holds water like a sealed bucket. When that saturated clay sits behind a retaining wall, it pushes outward with enormous force, and that pressure is the single most common reason walls crack, bulge, or collapse. Understanding why retaining wall drainage is critical in clay soil starts with one fact: clay expands when wet and shrinks when dry, so the soil behind your wall is never stable.
This guide breaks down the mechanics of water pressure, the warning signs of failure, the right backfill material, and a step-by-step weep hole installation you can follow.
The USDA Natural Resources Conservation Service soil survey classifies expansive clays as a leading cause of structural damage to foundations and walls.
How Hydrostatic Pressure on Retaining Walls Builds Up in Clay
Hydrostatic pressure on retaining walls is the force exerted by water trapped in the soil behind the wall. In clay, that water cannot drain away quickly because clay particles are tiny and tightly packed, so the water table rises and lateral earth pressure climbs with it.
Three forces work against your wall at once:
- Saturated soil weight increases the load-bearing demand on the wall
- Hydrostatic pressure pushes directly outward against the back of the wall
- Clay expansion adds swelling force as moisture content rises
Signs of Retaining Wall Failure to Watch For
Signs of retaining wall failure usually appear in a predictable order, and catching them early can save the wall. The first warning is water pooling at the base after rain, followed by visible movement.
Watch for these indicators:
- Bulging in the middle of the wall face
- Cracks in the wall or the capstones
- Settling or leaning of the top course
- Weep holes that stay dry or clogged
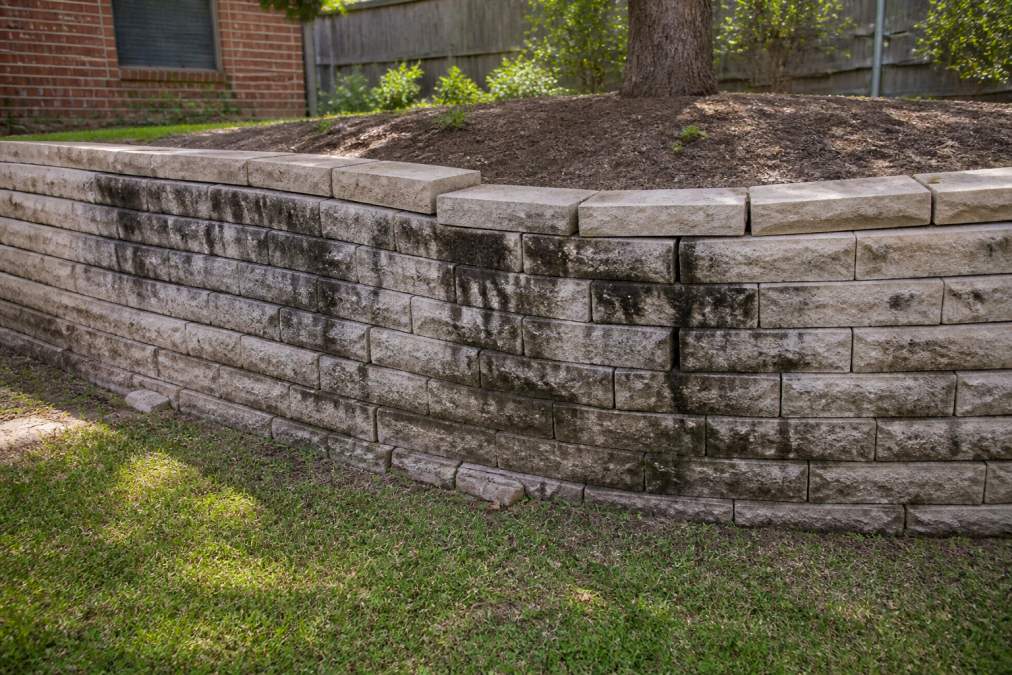
- Soil staining or dark streaks on the wall face
- Tilting of the entire wall away from the slope
The Best Backfill Material for Clay Soil (And What to Avoid)
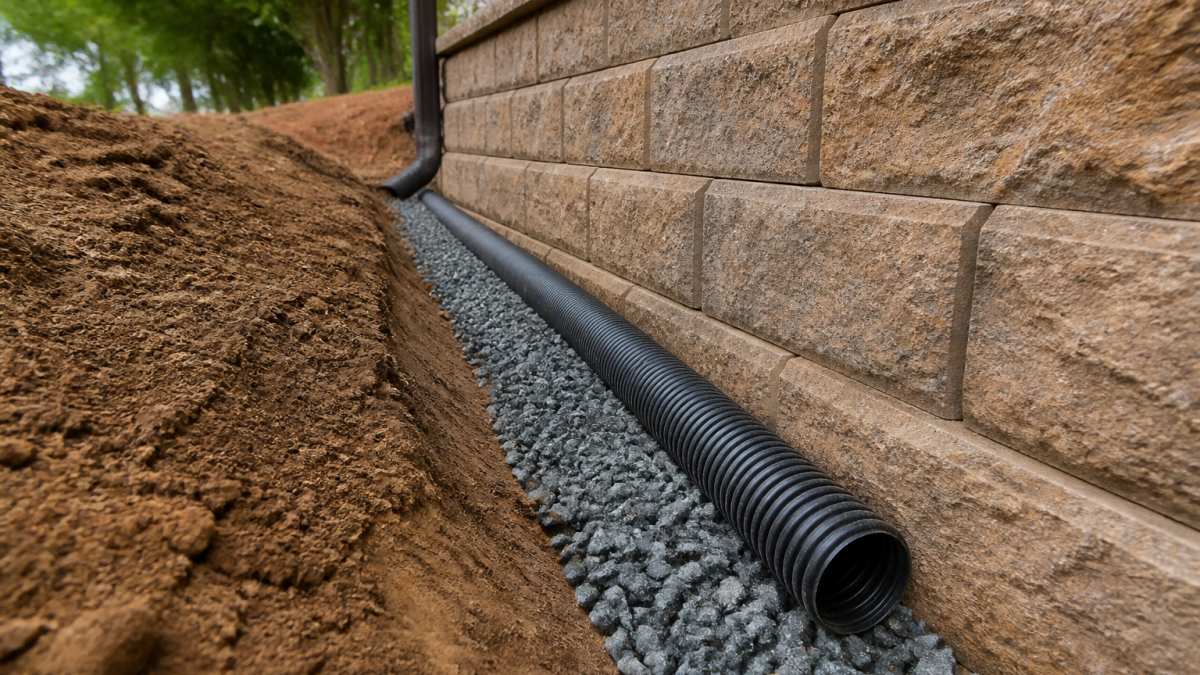
The best backfill material for clay soil is clean, angular, washed drainage aggregate, typically a 3/4-inch crushed stone or a No. 57 stone, placed in a drainage zone wrapped in non-woven geotextile filter fabric. This combination lets water move freely to the drainage pipe while keeping clay fines from migrating in and clogging the system. Properly managing drainage on clay remains a fundamental requirement for site stability, extending beyond structural walls to other landscape features such as artificial grass drainage on clay soil.
- Aggregate gradation. Use a narrowly graded, single-size crushed stone (No. 57 or 3/4-inch clean stone). A mix of sizes packs tighter and drains slower. Washed stone is preferred over crusher-run because crusher-run carries fines that defeat the purpose.
- Angular over round. Crushed angular stone interlocks and holds voids open; round river rock settles into a tighter, lower-void matrix and drains poorly.
- Filter fabric placement. Non-woven geotextile goes between the native clay and the gravel, with a minimum 12-inch overlap at seams. It must wrap the top of the gravel as well, or clay fines will wash down into the drain zone from above.
- Drainage zone width. A common rule of thumb is a gravel envelope at least 12 inches wide behind the wall, extending from the base of the wall up to within about 6 to 12 inches of the top of the backfill, so water has a continuous path to the pipe.
What to avoid:
- Native clay soil as backfill, which defeats the entire drainage system
- Round river rock, which packs tightly and drains poorly
- Sand alone, which migrates into the gravel over time
- Organic material like topsoil, which decomposes and settles
- Crusher-run or dirty stone, whose fines clog the voids the system depends on
How to Install Weep Holes in Retaining Walls: Step by Step
Learning how to install weep holes in retaining walls correctly is the difference between a wall that lasts decades and one that fails in two years. Weep holes are small openings in the wall face that let accumulated water escape instead of building up behind the wall.
- Locate the weep holes. Space them every 4 to 6 feet along the wall, just above the base course, and always at the lowest point of the wall.
- Drill or chisel the openings. Use a masonry bit sized to the drain outlet, angled slightly downward so water flows out, not in.
- Install the perforated pipe. Run it along the base of the wall, holes facing down, wrapped in filter fabric.
- Add the drainage aggregate. Fill around the pipe with washed gravel, keeping it separated from the native clay by filter fabric.
- Cap with fabric and topsoil. Fold the filter fabric over the gravel before adding topsoil to prevent fines from washing in.
- Test the flow. Pour water behind the wall and confirm it exits through the weep holes within minutes.
DIY vs. Professional Installation: When to Call a Hardscape Crew
Call a professional hardscape crew when your wall is taller than about 4 feet, when it holds back a slope above a structure, or when you see any sign of existing failure. Smaller decorative walls under that height are reasonable DIY projects; load-bearing walls are not.
The threshold comes down to three factors:
- Height above roughly 4 feet increases structural load and often requires engineering
- Surcharge from driveways, patios, or slopes above the wall adds lateral earth pressure
- Water table depth determines how much hydrostatic pressure the wall must resist
Maintenance Schedule and Soil Testing for Long-Term Retaining Wall Drainage
A retaining wall drainage system needs inspection twice a year and after any major storm. Maintenance is what keeps a correctly built wall working for decades, and the first maintenance step happens before you ever dig: confirming what kind of soil you actually have.
Confirm your soil type with a jar test
Most guides assume you already know you have clay. A five-minute jar test tells you for certain, and it costs nothing:
- Fill a clear quart jar about one-third full with soil from the area behind the wall.
- Add water until the jar is about three-quarters full, plus a pinch of dish soap to help particles separate.
- Shake hard for a full minute, then set the jar down and start a timer.
- After 1 minute, mark the settled layer, that is sand. After 2 hours, mark again, that is silt. After 24 to 48 hours, the final layer is clay.
- Compare the thickness of each band. If the clay band is the thickest, you have clay-dominant soil and need an aggressive drainage design.
Clay-specific maintenance schedule
| Interval | Task | Why It Matters in Clay |
|---|---|---|
| Every 6 months | Inspect weep holes and clear debris | Clogged outlets raise hydrostatic pressure fast in slow-draining clay |
| Every 6 months | Check for bulging, cracking, or settling | Clay swells and shrinks seasonally, so movement shows up early |
| Annually | Test soil moisture behind the wall | Persistent saturation signals the drainage zone is blocked |
| After heavy rain | Confirm water exits weep holes | Dry outlets mean the system is blocked, not that the soil is dry |
| Every 2-3 years | Verify filter fabric and gravel are intact | Fabric tears let clay fines clog the drain |
| Each spring, after the wet season | Re-check wall alignment and capstones | The wet-to-dry cycle is when most clay-related movement occurs |
What to actually look for during an inspection
- Weep holes: water should exit within minutes of a soak test. If not, the pipe or gravel zone is blocked.
- Wall face: any new bulge, crack, or stain is a signal, not cosmetic wear.
- Drainage pipe outlet: confirm the discharge point is clear and not buried by mulch or soil.
- Filter fabric: if you can see gravel through the fabric or fabric through the gravel, the separation layer has failed.
Soil testing is the step most homeowners skip. A simple jar test or a professional soil classification tells you how much clay you are dealing with and how aggressively the soil will expand. The Occupational Safety and Health Administration excavation guidance reinforces how seriously soil movement and stability must be treated on any project involving retained earth.
Frequently Asked Questions
What happens to a retaining wall if it doesn't have drainage?
Without drainage, water saturates the clay soil behind the wall. Clay holds that water instead of letting it pass through, so pressure builds against the wall with every rain. That pressure eventually pushes the wall forward, causing bulging, cracking, or full collapse. A retaining wall drainage system, including gravel backfill, filter fabric, and weep holes, gives that water a path out before it does structural damage.
Why is clay soil considered problematic for retaining walls?
Clay expands when wet and shrinks when dry. That constant swelling and shrinking moves the soil behind your wall, adding pressure and shifting the wall's foundation. Clay also has very low permeability, so water drains through it slowly and stays trapped. In the DFW area, this combination of expansion and poor drainage is the leading cause of retaining wall failure.
How does hydrostatic pressure affect retaining wall stability?
When water can't drain through clay, it fills the spaces between soil particles. That saturated soil pushes outward against the wall with force called hydrostatic pressure. The more water that builds up, the more lateral earth pressure the wall has to resist. Once that pressure exceeds the wall's load-bearing capacity, the structure starts to move, crack, or lean.
How do you install a French drain behind a retaining wall?
Excavate behind the wall base, line the trench with geotextile filter fabric, and lay a perforated drainage pipe on a bed of drainage aggregate. Cover the pipe with more gravel, wrap the fabric over the top, then backfill with free-draining material. The pipe must slope toward a drainage outlet. This system collects subsurface water and carries it away before it reaches the wall.